

The challenge: a mobile app UX recording setup for less than $50 that allowed us to record users’ interactions with a mobile app.
As a founder of the Feastfox app (an eating out app which saves you up to 50% when you book at the best restaurants for tonight) I needed to run recorded UX testing sessions.
No ad to show here.
UX agencies charge thousands of dollars to do this for you and I heard that many don’t even record the user taps (only screen recording).
The available commercial options were expensive and didn’t fit our needs, so we decided to build our own. Also, being a startup, we had a small budget.
What you have below is the learnings from a few lean iterations.
A few of the requirements for the setup:
- Allow the user to hold the phone as naturally as possible
- Allow the user to do recorded testing on their own phone
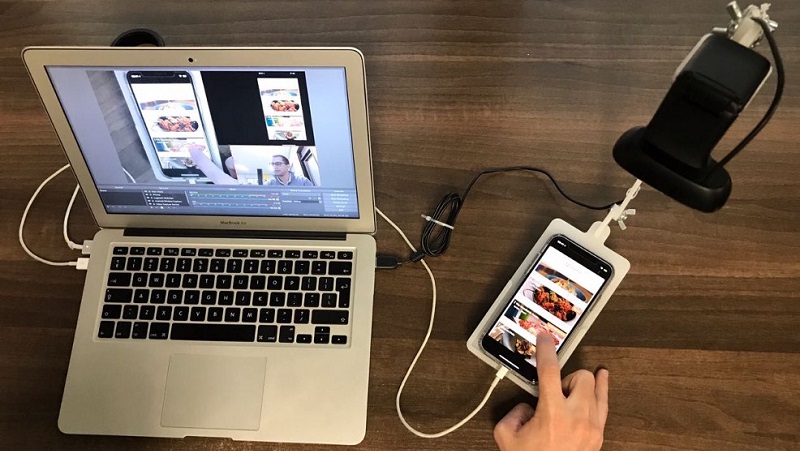
- Record the following inputs — user’s taps & swipes — user’s face — user’s voice as they narrate — a high def feed of the phone screen (in case we can’t make out what they are tapping on)… and the kicker — under $50 to setup and use (no expensive software licenses)
What can you buy off the shelf
I first checked to see if there was anything which could be purchased off the shelf as time is limited when you’re building a tech startup.
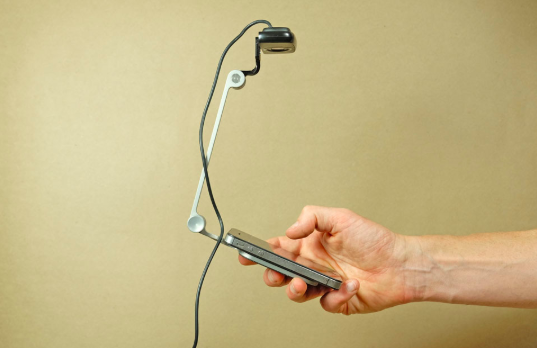
I found Mr Tappy (see below) however at $349 it was too expensive. It did, however, give me the idea for the testing sled with an adjustable arm and an attached webcam.

Building my own setup
I started off by purchasing a webcam — I settled on the Logitech C270 HD Webcam which you can get off Amazon or Takealot (if in South Africa) for under $30.
The webcam works perfectly and the quality of the video and sound recording is more than adequate. I did make an adjustment to the focus of the camera so that the phone screen filled more of the picture. This YouTube clip walks you through the process.
I then started on the sled. I had seen a few posts with very basic setups however they didn’t look very professional or like they would last long. After a few phone calls, I managed to find HotWired which specialise in Laser & CNC router cutting.
They are based in Cape Town, South Africa, however, I’m sure there is someone who has similar equipment in your neighbourhood. They were able to transform my idea into an early prototype.
The design was cut out of a durable perspex. The cutting cost approx $15 and the wingnuts and bolts to secure the pieces and cable ties to keep everything neat about $5.
What we learnt testing different versions of the sled
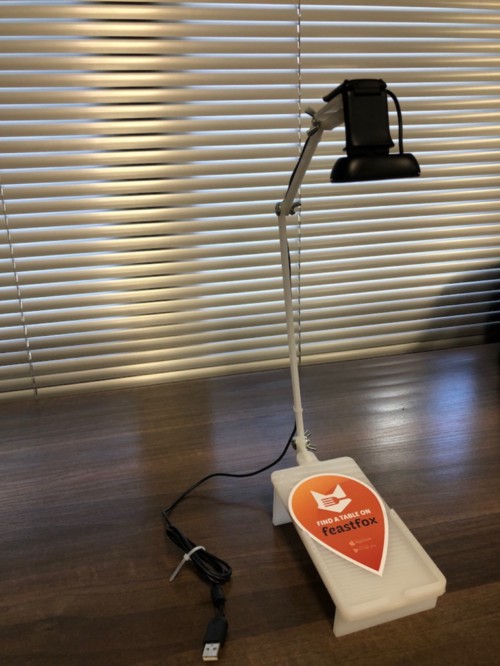
- The first version had a flat sled which the user had to hold with the phone in their hand (rather than having it on a flat surface) — while this is more in line with how a user will naturally hold their phone it meant that the setup was unstable and the webcam wasn’t always capturing the screen.
- The second version had small rubberised feet which helped it stay put on table however the user couldn’t fit their hand under the sled which meant that the user had to swipe with their index finger rather than their thumb (more natural).
- The current version (pictured below) allows the user to wrap their hand underneath the phone and sled whilst it remains on a table. The legs at the top are slightly higher than those at the back so that the screen is tilted towards the user. It also has a ridge at the bottom which keeps the phone in place with a gap for the power cable (learnt this was required the hard way).

Now that we had a testing sled I needed software to record all the different inputs into one video which could be shared with teammates or even streamed in real time for other team members to watch and take notes in another room.
After reading lots of blog posts, getting recommendations (only to find they required payment after a short trial) and testing out the different software I found Open Broadcaster Software.
It is completely free and does everything I require. You can add multiple input sources and it records it in a single video.
For iPhones I connected the iPhone to the MacBook using a lightning cable and it reflects in Open Broadcaster. For Android I had a bit of an issue as MacBook and Android don’t work very well together.
I installed a software called Vysor on my MacBook and on an Android phone. At this point, we can’t do testing with a user’s own device if they are using Android as we had to make some changes in developer options on the phone to allow the connection (see how here) and install Vysor on the phone.
I was able to use the trial version of Vysor and use the Window Capture feature on Open Broadcaster to record the Vysor window.
What we learnt
With a budget of $50 and a bit of research you can put together a mobile app UX testing setup that does as good a job as anything available commercially.

This piece initially appeared on Stuart Murless’s Medium blog — see it here.